ssp.karnataka.gov.in Pre-Matric Scholarship 2020-21 : State Scholarship Portal
| Want to comment on this post? Go to bottom of this page. |
|---|
Organisation : State Scholarship Portal Karnataka
Scholarship Name : SSP Scholarship 2020-21 | Pre-Matric Scholarship 2020-21
Applicable For : Class V to Xth Students
Applicable State : Karnataka
Last Date : 20.06.2021
Website : https://ssp.karnataka.gov.in/
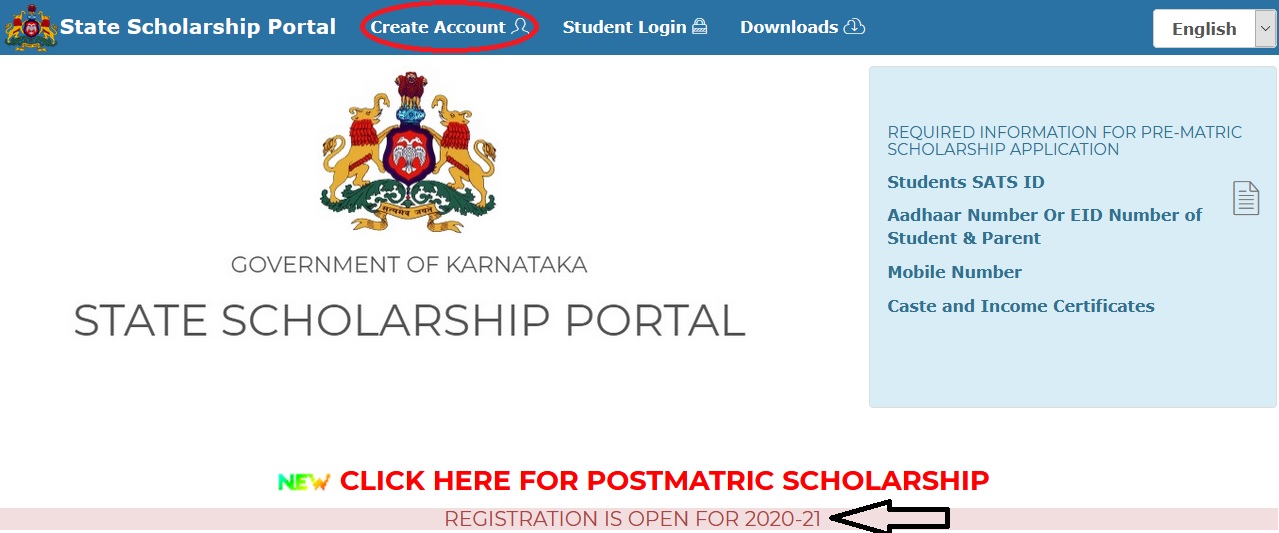
SSP Karnataka Pre-Matric Scholarship
Registration is OPEN for 2020-21.
Related / Similar Scholarship : SSP Post Matric Scholarship 2020-21
Who Can Apply?
1. Students those who have applied under NSP Government of India only are eligible to apply under SSP Government of Karnataka.
2. Scholarship will be awarded to the students who have secured not less than 50% marks or equivalent grade in the previous final examination (Not applicable for students studying in 1st std)
3. Annual income of the students’ Parents/ Guardians from all sources should not exceed Rs.1.0 Lakh.
Requirements
REQUIRED INFORMATION FOR PRE-MATRIC SCHOLARSHIP APPLICATION
** Students SATS ID
** Aadhaar Number Or EID Number of Student & Parent
** Mobile Number
** Caste and Income Certificates
How to Apply?
Student has to create an account in order to login to portal for applying scholarships. Just follow the below steps to apply for the Pre Matric Scholarship.
Create An Account
Steps :
Step 1 : Visit the official website provided above and Click on the “Create Account” link in the menu.
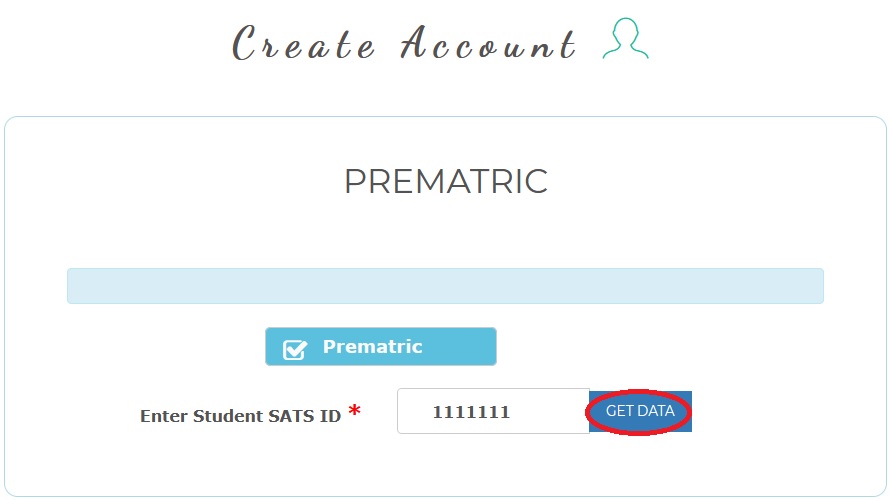
Step 2 : If the applicant is studying in classes between 1 to 10, then he/she should select “Prematric”
Step 3 : The applicant should then enter his/her SATS ID in the “Enter Student’s SATS ID” input field and should click on “Get Data” button.
Step 4 : Once the applicant clicks on “Get Data” button, the following details fetched from SATS will be displayed
** Name
** Father Name
** Mother Name
** Date of Birth
** Present Class
** School Name
Step 5 : The applicant should then click on “Save & Proceed” button to continue with Account Creation process.
Step 6 : If the displayed SATS details are correct, then the applicant should click on “Yes” button and continue with the account creation process.
Step 7 : If the displayed SATS details are not correct, then the applicant should click on “No” button and should provide his/her correct SATS ID.
Step 8 : If SATS ID Provided by the applicant is correct but the name and other details being displayed are incorrect, then the applicant should contact his/her school.
Note :
Please ensure that the details being displayed are pertaining to the applicant. If the details being displayed are incorrect but applicant clicks on “Yes” then, application is likely to be rejected.
Step 9 : If the applicant clicks on “Yes” button, then he/she will be asked to provide his/her contact details (Mobile number) in the “Enter Your Mobile Number” input field and click on the Submit button
Step 10 : Once the applicant clicks on “Submit” button, an OTP will be generated and sent to the mobile number specified by the applicant.
Step 11 : Applicant should enter the OTP received in the input field provided and should then click on “Submit” button.
Step 12 : In case the applicant has not received an OTP, then he/she should click on “Resend OTP” button. Applicant should enter the OTP received in the input field provided and should then click on “Submit” button to continue with the process of account creation.
Step 13 : Once the applicant enters OTP and clicks on “Submit” button, he/she will then be asked to create a password for his/her account
Create Password
Applicant should follow the following rules while creating password
** Password should be of at least 8 characters,
** Password should contain at least one digit,
** Password should not contain any blank spaces.
Step 14 : The applicant should enter password in the “Password” input text field provided and should reenter the password in the “Confirm Password” text field.
Step 15 : The applicant should then click on “Submit” button. Once the applicant clicks on “Submit” button, his/her login account will be created with the applicant’s SATS ID as User ID.
Student Login
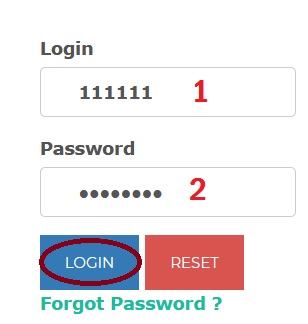
Step 1 : Student has to login to his/her account by providing his/her Login ID and Password in order to apply for scholarships.
Step 2 : Applicant should enter the Login ID & Password and click on “Login” button to login to his/her account
Step 3 : Upon Successful login, Student Account Homepage will be displayed. Following Menus are available in the student account homepage
a) Home
b) Edit
c) Scholarships
d) Profile
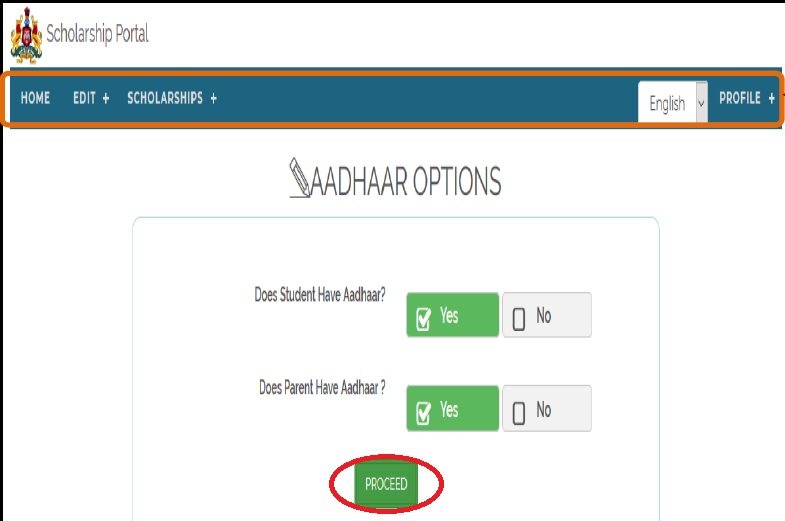
Step 4 : The applicant should then click on “Proceed” button to provide the Aadhaar details (i.e.; Aadhaar Number & Aadhaar Name) of both the parent and the applicant in the input text fields provided.
Note :
EID Number and EID Name fields are mandatory in case both the applicant and parent do not have Aadhaar.
Step 5 : If the details being displayed are correct, then the applicant should click on “Yes” button and continue with the application submission
Certificate Details Entry
Step 6 : After successful Aadhaar authentication, “Enter Certificate Details” Page will be displayed to the applicant.
Step 7 : The applicant will be asked to provide his/her Caste Certificate ID (in case the applicant intends to seek scholarships provided on the basis of one’s caste), NSP ID and Caste Cum Income certificate ID (in case the applicant intends to seek scholarships provided to students of minority community).
Step 8 : Religion, Category, Caste Certificate & Income Certificate fields are mandatory.
Step 9 : NSP Registration ID & Caste cum Income Certificate Number fields will be mandatory if the applicant selects any minority community from “Religion” drop down list.
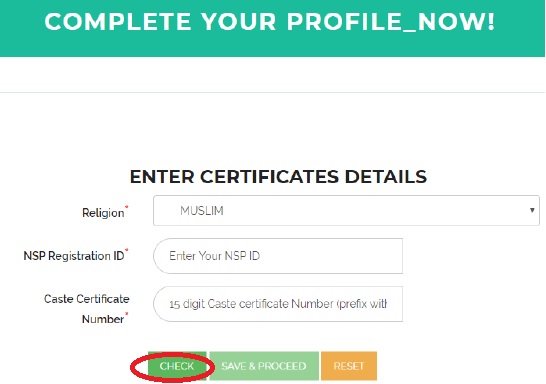
Step 10 : Applicant should provide his/her valid Caste Certificate Number, Income Certificate Number and should click on “Check” button.
Step 11 : Applicant should click on “Save & Proceed” button to continue with the application submission process.
Step 12 : The applicant will be asked whether he/she is a Day Scholar or Hosteller. If the applicant clicks on Hosteller checkbox, then the applicant should provide the following details of the hostel he/she is residing in
** District
** Taluk
** Department
** Hostel Name
** Hostel Registration Number
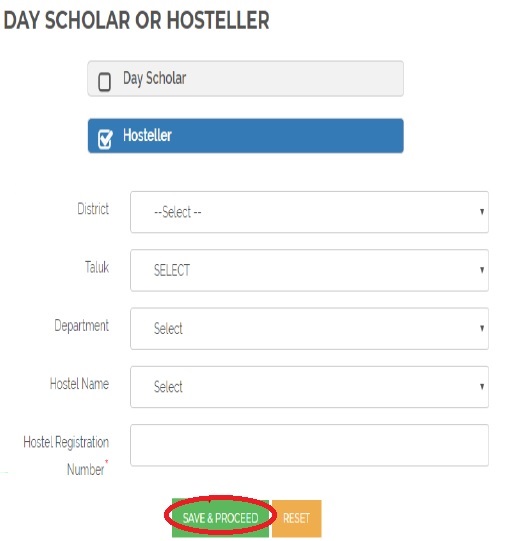
Step 13 : Applicant should choose either Day Scholar or Hosteller checkbox, provide hostel details (if “Hosteller” checkbox is selected) and should click on “Save & Proceed” button.
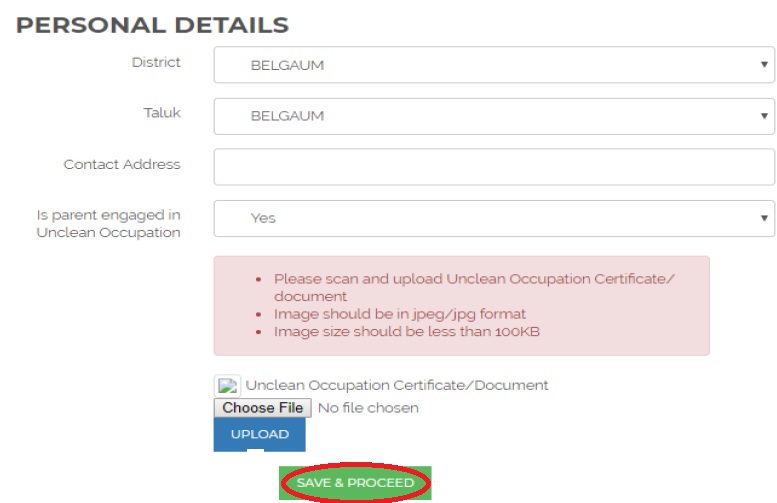
Step 14 : Next, Applicant enter the personal details and upload the required documents and Click on “Save & Proceed” button
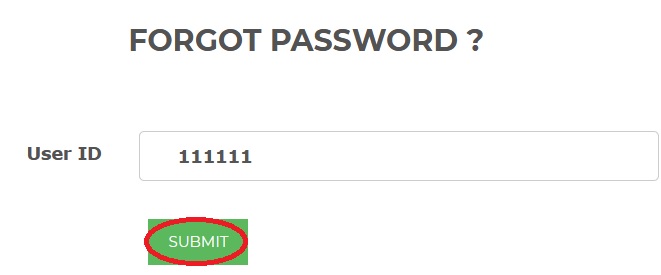
Forgot Password ?
If you don’t remember your password then enter your User ID and click Submit button to reset your password
Print Acknowledgement
Step 1 : When the applicant uploads his/her scanned photo and clicks on “Save” button, an Acknowledgement will be displayed to the applicant, for the scholarship that he/she has applied.
Step 2 : Applicant can also take print of the acknowledgement form by clicking on “Print” button.
Helpline
1. Social Welfare Department – 080-22634300 / 9008400078
2. Tribal Welfare Department – 080-22261789
3. Department Of Minority Welfare – 080-22535931
4. Backward Classes Welfare Department – 080-22374836 / 8050770005
not receving otp to my no. wat to do
good imformation
photo upload is mondatry?
what to do permission letter where to submit or give?