mahadbtmahait.gov.in Scholarship 2020-21 Online Registration : MahaDBT Portal
| Want to comment on this post? Go to bottom of this page. |
|---|
Organisation : Aaple Sarkar DBT, MahaDBT portal
Facility : Online Registration/ mahadbtmahait.gov.in Scholarship 2020-21
Applicable State : Maharashtra
Website : https://mahadbt.maharashtra.gov.in/login/login
MAHA DBT MAHAIT Registration
Application acceptance (New/Renewal) has been commenced for New A.Y. 20-21 from 3rd Dec 2020.
Related / Similar Scholarship : MahaDBT Post Matric Scholarship 2021-22
Rules For Application
Rules for application for re-applying any scheme In A.Y. 2020-21
Before applying application to any scheme for A.Y. 2020-21, all your applications from previous year i.e. A.Y. 19-20 should be disposed.
Disposed means the status of the application must be Approved, Rejected, Allotted or Disbursed. Please note, you cannot apply the application for A.Y. 20-21 if your application is in under scrutiny or send back status.
As we have clarified the cases below, the applicant must follow the steps as per your applicable case.
Case-1 :
Fresh Student to the Portal for AY 2020-21
** Applicant should register on MahaDBT Portal
** Applicant should login into MahaDBT Portal
** Applicant should create his/her profile
** Applicant should apply for scheme
Case-2 :
Last year Passed (A.Y. 2019-20) Students or Students with Gap & also benefits received Students
Scenario-1 : Fresh Application- (Previous year all the applications disposed)
** Applicant should register on MahaDBT Portal
** Applicant should login into MahaDBT Portal
** Applicant should create his/her profile
** Applicant should apply for scheme
Scenario-2 : Re-Apply Case- (Scrutiny desk sent back the application to re-apply)
** Applicant will have to update the required information in the profile or scheme specific as requested by the scrutiny
** Applicant have to re-apply application
** Application Scrutiny should be completed
** Allotment will be done
Case-3 :
Last year Passed (A.Y.19-20) Students but Scrutiny still Pending for AY 19-20
** Application scrutiny should be completed
** Application allotment will be done
** Applicant will be able to apply for A.Y. 20-21
Case-4 :
Reapply Pending Student (A.Y.19-20) {Both Schemes Specific & Profile related changes}
** Applicant will have to update the required information in the profile or scheme specific as requested by the scrutiny
** Applicant have to re-apply application
** Application scrutiny should be completed
** Application allotment will be done
** Applicant will be able to apply for A.Y. 20-21
Case-5 :
Non Aadhaar Registered Student (A.Y. 19-20) if updated Aadhaar then 1 step back
** If applicant update to Aadhaar then again scrutiny by last concern desk
** Application allotment will be done
** Applicant will be able to apply for A.Y. 20-21
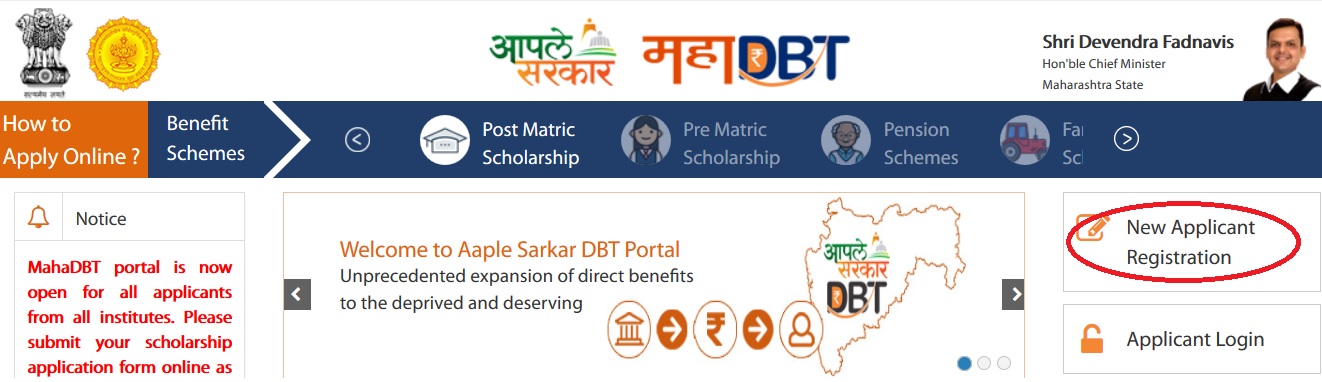
How to Register?
New user will register on this portal and then get scheme related benefits after login in through the registered username and password. The new user to Register into the portal, click on “New Registration” button
Using Aadhaar Number
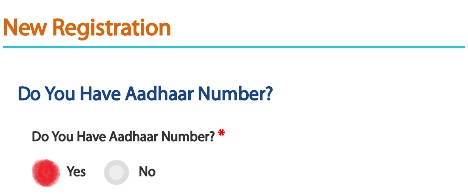
Step 1 : Do You Have Aadhaar Card?
Please select “Yes” and click on Continue button to continue with Registration process.
Step 2 : Choose Authentication Type – There are two types of authentication available.
** OTP – If the mobile number registered with Aadhaar, then the user can select the authentication type “OTP”
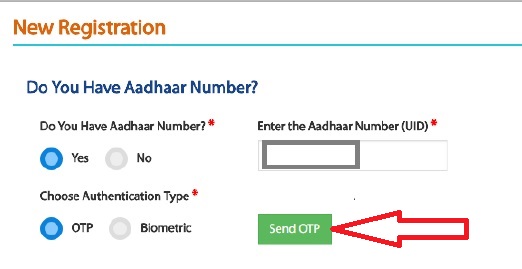
** Biometric – If the mobile no not registered with Aadhaar, then the user can select the authentication type as Biometric.
** If your Mobile Number registered with Aadhaar, then choose the authentication type as “OTP”.
** Tick on the consent check box to agree to share your information with Maharashtra government for DBT purpose
Step 3 : Enter Aadhaar number and click on “Send OTP” button. The system validates the aadhaar number and sends the system generated “OTP” to the registered mobile number
An alert message displayed saying that – OTP for Aadhaar authentication has been sent to your Aadhaar linked registered Mobile number. Click on OK button.
Step 4 : Enter the received OTP in the system and click on “Verify OTP” button. Post successful OTP verification an alert message “Authentication Successful! Please click on Continue” will be displayed on the screen. Click on OK button to continue with registration
Step 5 : Post Successful OTP verification the Applicant details fetched from UIDAI will be auto populated in the Personal details fields Personal Details, Address Details, Bank Details.
Note :
If there is any change in the details, the applicant should contact UIDAI to update the relevant information
Step 6 : Creation of Applicant’s Username and Password – Applicant will need to create the User Name and Password to access the system in this step.
Step 7 : Applicant will enter the User Name, Password, Confirm Password and Captcha and click the Register button.
Step 8 : On clicking the Register button, the system validates entered details and display‘s the alert message saying that – Profile created successfully.
Step 9 : User can use the registered User Name and Password to login into the Aaple Sarkar DBT portal.
Using Biometric
Step 1 : If Mobile Number not registered with Aadhaar, the User can select the authentication type as Biometric.
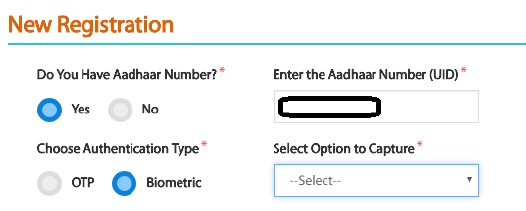
Step 2 : Then the user can view the Biometric authentication form – Enter Aadhaar number, User ID, Pass word and confirm password. The User has to put the finger on Biometric device for to get scan and verify
Step 3 : After successful verification, the User can login with created User ID and Password.
Using Non Aadhaar
Step 1 : Click on New Applicant Registration. For Question – Do you have Aadhaar Number? Select – No option and continue
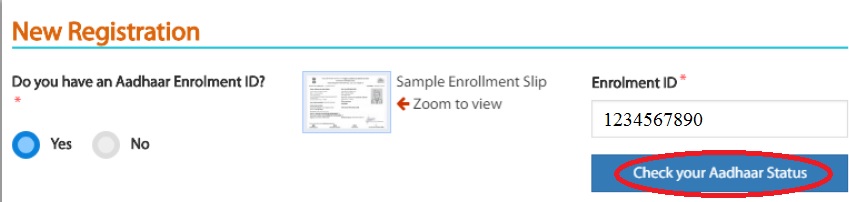
Step 2 : New Registration form page will be displayed. The system will ask, “Do you have an Enrolment ID” Click on “No” Button
Step 3 : After No button is selected, Book appointment for Aadhaar button should be displayed and on click URL – https://appointments.uidai.gov.in/ should be displayed
Step 4 : Enter Further Form details and finally click on “Save” button
Using Non Aadhaar – Enrollment ID Flow
Step 1 : Click on New Applicant Registration For Question – Do you have Aadhaar Number? Select – Yes option and continue
Step 2 : The system will ask, “Do you have an Enrolment ID” Click on Yes Button. Enter Enrollment ID and click on “ Check your Aadhaar Status”
Step 3 : If the Enrollment ID (EID) is Generated, then the user will be redirected to step 2 of Aadhaar registration flow
Step 4 : If the Enrollment ID (EID) is Rejected, the user should start registering on DBT Portal without Aadhaar
Step 5 : User should know the reason of rejection of the Enrolment ID and should search for Aadhaar Permanent Enrolment Center (PEC) and re-enroll for getting the Aadhaar.
Step 6 : If the Enrollment Id (EID) is Under process, the user has to Enter the enrolment number (Enrolment Id +Date Timestamp) and click on “Continue” button to proceed with Registration process on DBT Portal.
Official website can’t be reach always. Why??